
 Finding the drawer wasn't too bad - found 3 at one flea market and chose this one...
It was dusty and had some gunky nasty old sticky-glue globs in it, but otherwise it was bigger and in better shape than either of the other 2 trays I found that day.

 I cleaned, scraped, sanded and then spray painted. Cleaning each of those tiny cubbies took forever! And that old wood really soaked up the paint - probably used close to a full can of spray paint. A little sandpaper and a putty knife made the distressing part easy - I'm still debating on whether I should do a little more. I used a sabre saw to cut out some of the dividers to make longer spaces for a few necklaces. Next, to add hardware. What a pain! First, I had trouble finding just the right size eye-bolts and cup hooks, etc. After visits to 3 different stores, I finally had what I thought would be enough. I gave them a shot of the same ivory spray paint as the drawer. Next I created a template for marking where to put the eye-bolts in each cubbie so they would look pretty consistent. I drilled teeny-tiny pilot holes, then screwed the hardware in by hand. Do you see how many bolts/hooks there are? No wonder my hands kept going numb! And I found I still needed another package of eye bolts - should have counted before shopping :)
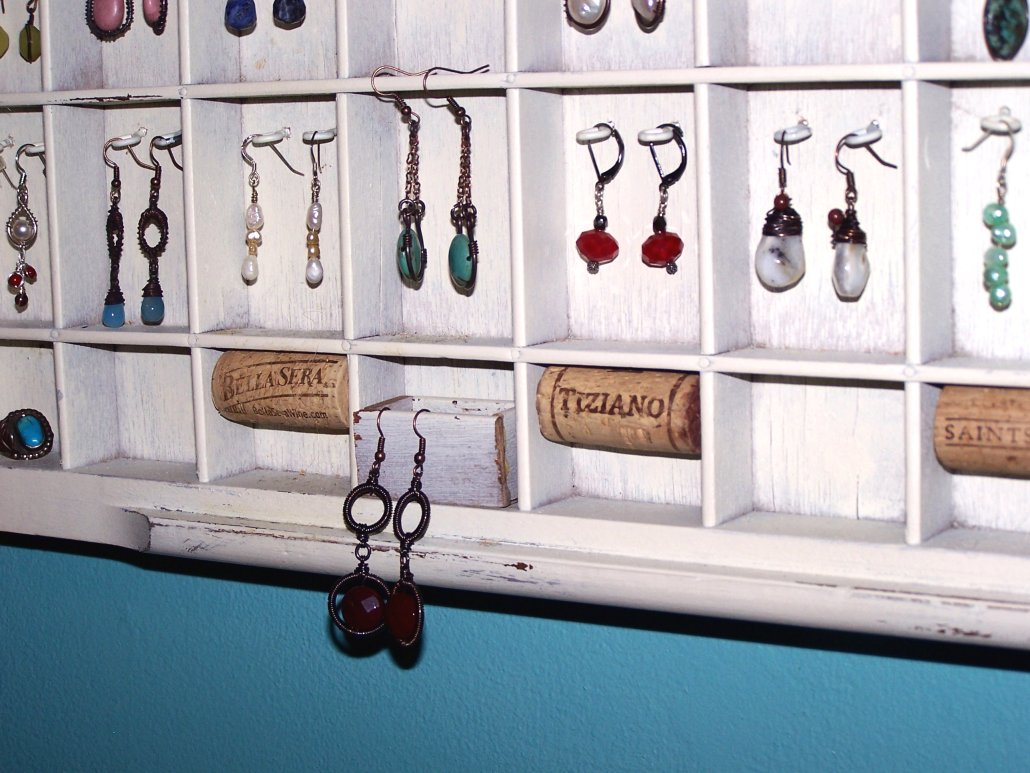 I thought it was looking a little bland, so I added a colonial style hammered drawer pull to the top, after giving it a shot of the ivory spray paint and a bit of sanding. And then I realized I wanted something extra for my post earrings. The hooks and bolts were great for hanging kidney or french wire earrings, but I wanted something secure to push posts into. That's when the idea hit to add some wine corks. I put some velcro on the backs of the corks and in some of the cubbies so I can easily move them around, or replace corks if they start looking tacky. And do you see that teeny-tiny box on the bottom row? I made that from pieces of the dividers I had removed. It serves as a little storage area for earring backs - and to dangle a pair of earrings from too.
 For now, my organizer is hung with a long strip of old muslin, but I can change that out with other fabric or ribbon, or it hang it right on the wall.
 It's done at last! Who would have 'thunk' this would have been such a big darned deal? I love the end result though, so I'll probably forget all the aggravations pretty soon. And at least the cost wasn't bad. $20 for the tray + approx. $8 for hooks, eye-bolts, paint, etc. And it shows off the gorgeous jewelry my daughter designs along with my other pieces perfectly!
 Linking up to my favorite weekly linky party at:
3 comments:
I love it - I want one. The search for a tray begins...
What a great idea, love the wine corks in there! Thanks so much for linking up to Beyond the Picket Fence.
Very nice! You weren't kidding, it's practically the same story as mine. lol. I like how you put the corks in and left some empty. I wonder which way is easier, screwing the eyehooks into the tops or the back? What to do what to do with my next one. :)
Thanks for stopping by www.DavisDomestications.blogspot.com
Following you now.
Post a Comment