Showing posts with label junk makeover. Show all posts

Sunday, April 24, 2011

Dresser Facelift - Under $25

My daughter and I found this great little Thomasville dresser on Craigslist.  
Good quality, good bones, but abused...a serious dog chew on the base
trim, lots of scratches and scrapes, a missing drawer handle, etc.
At $15 it was still a bargain, plus we had spent weeks looking
for one just the right size for her room, and finally, this was it!
My husband did his part by using an air grinder to smooth down the dog chewed
area and then ground down the opposite end to match.  Well, "match" might
not be exactly right, but it was close enough!  After removing the
handles, some sanding, some primer, a bit of wood filler and
more sanding, it was ready for paint.  
Pure white was my daughter's choice, so I bought a good quality white paint and
gave it a couple of coats with a foam roller and foam brush.  She wanted a
clean, modern look, so I located the drawer pulls I had removed from my
kitchen renovation a few years ago (see, there's a reason I hoard :)
and scrubbed them up. They look like brand new - which really
speaks to the quality of things made 40 or more years ago.
Try to ignore the clutter on the floor and next to the dresser - that's another new
storage project for this room - to be unveiled soon!  I really like how the fresh
snow white of the dresser complements the cool gray shades of the
 floor (painted concrete) and walls.
This room has gone from peachy-country-romantic-girly to calm-modern-mature.
Perfect for my daughter's last year at home before graduating college and
riding off into the sunset with her prince. And still perfect for when that
room becomes our guest bedroom/my crafting space.

post signature

Sunday, January 23, 2011

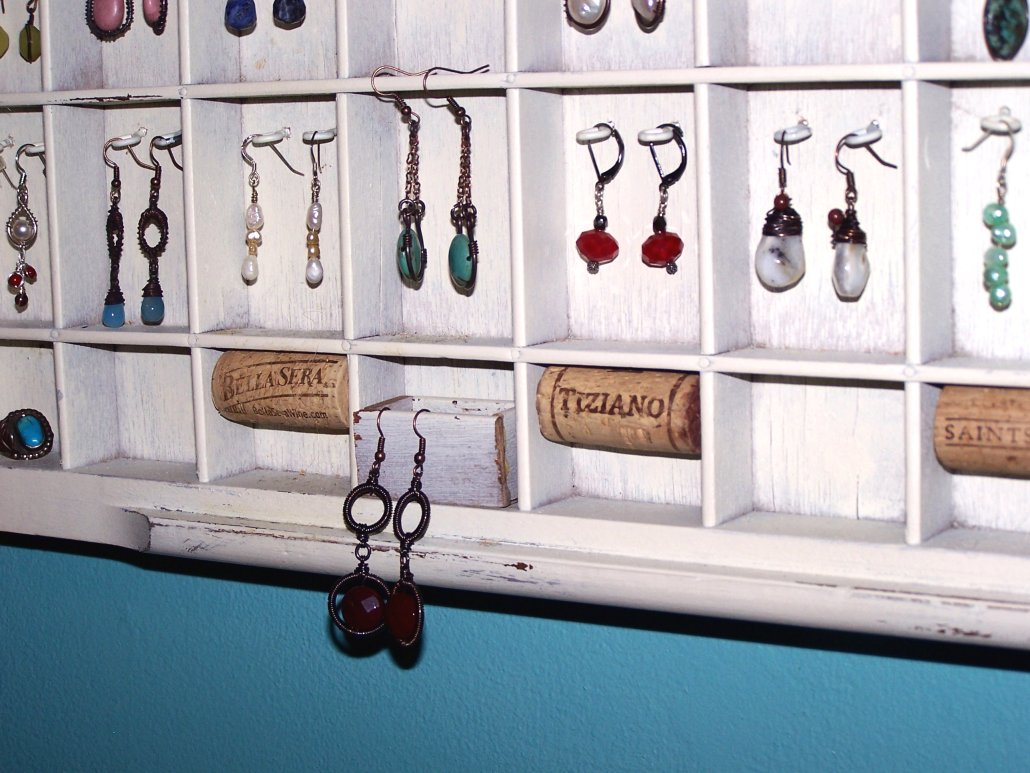
Printer's Drawer Makeover

So...I saw a gorgeous jewelry organizer made from an antique printer's drawer and figured it would be soooooo easy to make myself and sooooooo much cheaper than buying it outright. Another of those "I can do that myself" things that wasn't remotely as easy as I thought!
Finding the drawer wasn't too bad - found 3 at one flea market and chose this one...
It was dusty and had some gunky nasty old sticky-glue globs in it, but otherwise it was bigger and in better shape than either of the other 2 trays I found that day. I cleaned, scraped, sanded and then spray painted. Cleaning each of those tiny cubbies took forever! And that old wood really soaked up the paint - probably used close to a full can of spray paint. A little sandpaper and a putty knife made the distressing part easy - I'm still debating on whether I should do a little more. I used a sabre saw to cut out some of the dividers to make longer spaces for a few necklaces. Next, to add hardware. What a pain! First, I had trouble finding just the right size eye-bolts and cup hooks, etc. After visits to 3 different stores, I finally had what I thought would be enough. I gave them a shot of the same ivory spray paint as the drawer. Next I created a template for marking where to put the eye-bolts in each cubbie so they would look pretty consistent. I drilled teeny-tiny pilot holes, then screwed the hardware in by hand. Do you see how many bolts/hooks there are? No wonder my hands kept going numb! And I found I still needed another package of eye bolts - should have counted before shopping :)I thought it was looking a little bland, so I added a colonial style hammered drawer pull to the top, after giving it a shot of the ivory spray paint and a bit of sanding. And then I realized I wanted something extra for my post earrings. The hooks and bolts were great for hanging kidney or french wire earrings, but I wanted something secure to push posts into. That's when the idea hit to add some wine corks. I put some velcro on the backs of the corks and in some of the cubbies so I can easily move them around, or replace corks if they start looking tacky. And do you see that teeny-tiny box on the bottom row? I made that from pieces of the dividers I had removed. It serves as a little storage area for earring backs - and to dangle a pair of earrings from too.For now, my organizer is hung with a long strip of old muslin, but I can change that out with other fabric or ribbon, or it hang it right on the wall.
It's done at last! Who would have 'thunk' this would have been such a big darned deal? I love the end result though, so I'll probably forget all the aggravations pretty soon. And at least the cost wasn't bad. $20 for the tray + approx. $8 for hooks, eye-bolts, paint, etc. And it shows off the gorgeous jewelry my daughter designs along with my other pieces perfectly!Linking up to my favorite weekly linky party at:
Beyond The Picket Fence

Sunday, June 14, 2009

Inspiration Corner

I should have taken a "before" photo...but I think I can explain. This little wall is just one section of a fairly large room that serves a variety of purposes. My desk, filing cabinets, computer, printer, etc. take up nearly 1/2 the room. A TV, VCR, DVD player and toy chest create an area for the grandkids to enjoy. One tiny spot is the workout center - for the treadmill. And the closets are filled with out-of-season clothing, wrapping paper, craft supplies, and so on. Needless to say it can be a bit distracting for someone (namely artsy daughter) to focus on her jewelry design, sculpting or paintings with so much going on. So, I encouraged her to make this spot her own. I didn't have to say it twice! Naturally it had to be done on a bare-bones budget. Not a problem for a junk-savvy kid with plenty of imagination.

A small dresser-turned-cabinet hides shelves for storing her supplies. The little table was a freebie from her brother's roomie - rough enough to be charming and allows her to work without concern for damaging the finish. Great space for bigger tools, paintbrushes and a lazy susan.

The window frame was 25 cents at a garage sale - it was horrible! Someone had sponged it with purple and green paint and glued plastic flowers to it. It's now a warm chocolate brown with cool pale green highlighting the openings. Old white porcelain insulators attached across the top ($1 yard sale find) serve to hold the necklaces she creates. An old porcelain doorknob (25 cents-yard sale) attached at bottom center will be useful as another hook of sorts.

The oak box with gold tone handle and corners, to the left of the table, is a wonderful little tool chest found at a yard sale for $7.50! It is even lined with felt, and holds some of her more delicate and treasured tools, as well as some finished earrings.

Brown curtains and rods ($34 total at a liquidation store) hide the closet openings. Robin's egg blue paint ($15) provides a calm, soothing cool background for the creation process.

Even across the room, deep in thought, clicking away at my keyboard, I find myself turning to gaze at it. Definitely a great spot for dreaming up new ideas and then bringing them to life.
Related Posts Plugin for WordPress, Blogger...